Setting up your WordPress website for a course or project shouldn’t be hard. There is a small learning curve but the more you use it, the more you will see how easy it can be. WordPress.org provides a good in-depth overview of how to get started on their Codex pages.
Look for a Login or Dashboard link and click on it. If there is no link, you can add ‘wp-admin/’ to the end of the URL. For example, if your class is located at https://math403x.community.uaf.edu/ change it in the address bar to https://math403x.community.uaf.edu/wp-admin/ –
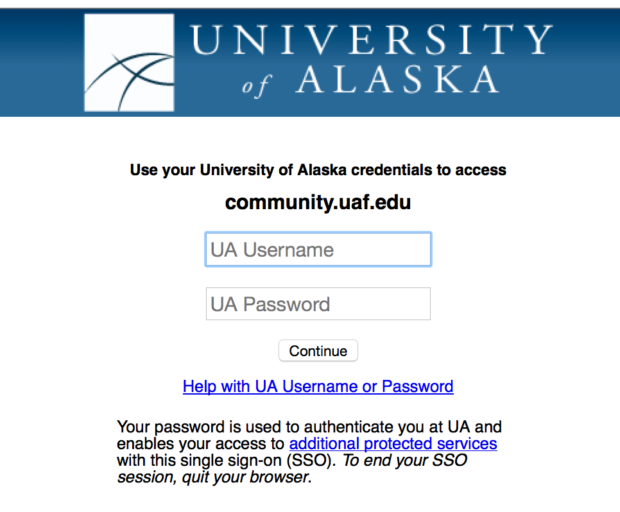
Use your UA login credentials (same as you use for Blackboard and UA Google Apps) on this screen:
If you are missing a login link, you can go to Widgets-> and add a ‘Meta’ section to the sidebar. The ‘Meta’ widget includes a login link.
I can't remember the address of my class website
Login to Community and then click on the ‘My Sites’ link at the top left, you will find all the course websites you are a member of.
ACCESSIBILITY
How do I make my site accessible?
Follow these best practices consistently when building your website in order to increase accessibility.
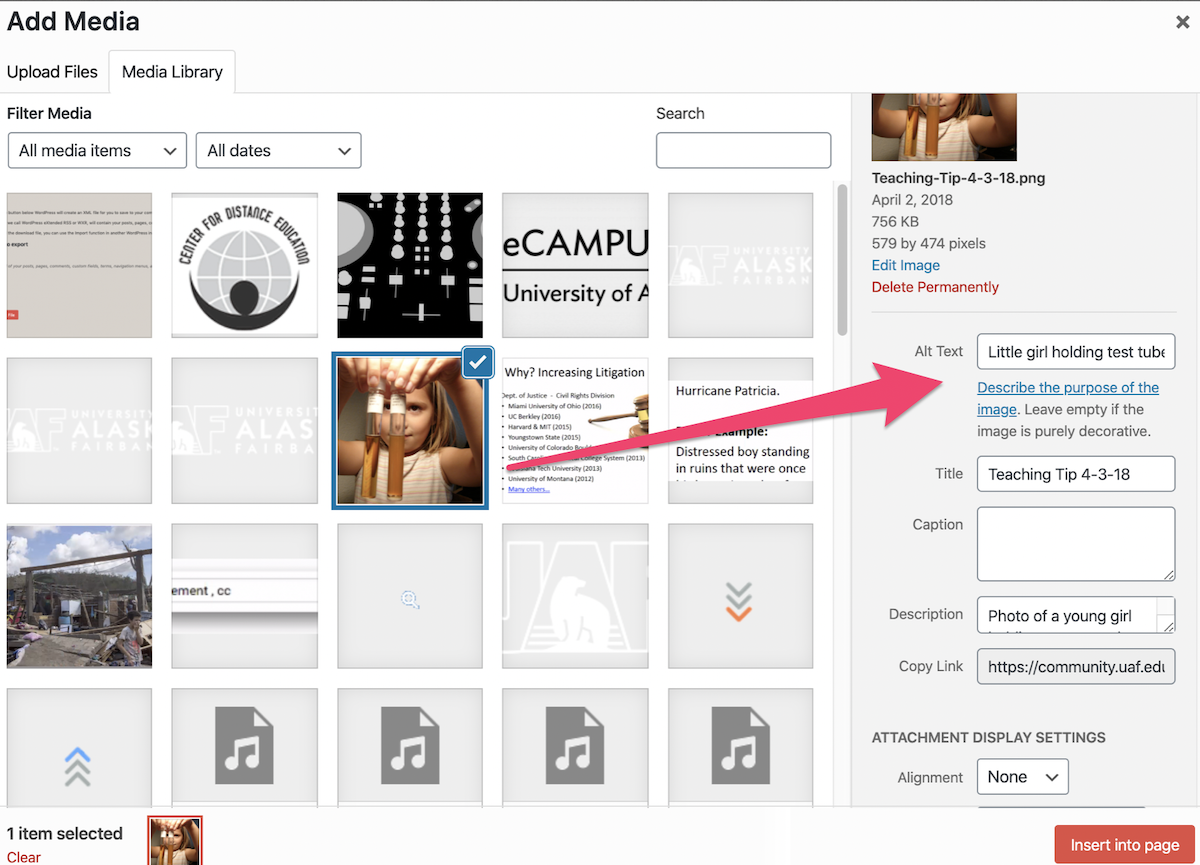
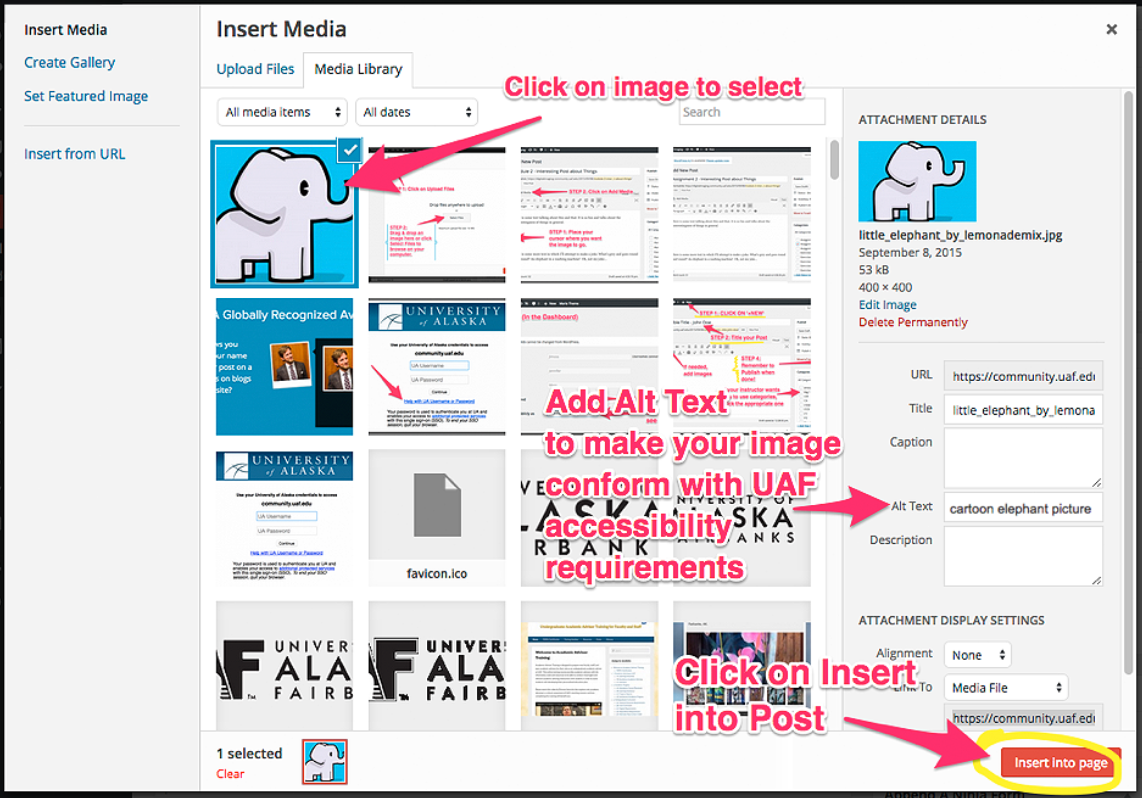
Alt Text
Always fill out the Alt Text area when you add an image. The alt text gives an overview of what is being shown in the image. For example:
Structure – How to use Headings
Always use good heading structure. When you have a subheading, don’t just make it bold, use the proper heading based on the structure of the rest of your page. For example:
There are other considerations such as ensuring good contrast in your images, using appropriate fonts and highlighting but these are some of the top issues we see. If you would like to know more about website accessibility, please visit us online at iTeachU or during Open Lab.
USING WORDPRESS
Getting started with WordPress - for Instructors
Perhaps the best way to get started  is to dive into your new site and start playing with it to see what you can do. In addition to the other content on this page, there are a few key concepts that are helpful to understand, which we outline below:
Dashboard
Here is a general overview of the Dashboard. (Some items may differ from what is available on Community. )
Themes
Your new site will come with a default theme. You can change your theme easily through the Appearance -> Themes in the dashboard. It is generally best to choose your theme before you customize your site.  The theme customization area of the dashboard provides many options you should look through, these are theme dependent and will vary.
Pages vs Posts
Pages are for content that you don’t need to update very often such as your syllabus or lessons. Posts are for new content that will be organized by date published, most commonly these are used for blogging.
Student Discussions
Typically, student discussions fall into two organizational structures in WordPress:
Instructor creates a post and instructs students to reply or comment on their post. Images are not allowed in reply/comments so that is a limitation of this structure.
Instructors allow students to create their own posts and reply to each other’s posts. Â Students are able to insert media such as images and video. This is the more common method.
Menus
You can set up custom menus in the Dashboard->Appearances->Menu area. Once you have a new menu created, choose items (pages, posts, categories, etc) from the left side menu. Drag/drop to rearrange them, customize the titles, and to create indented menu structure. You may need to declare where this menu will appear on the site as well.
Categories
Posts can be assigned categories, such as lesson 1Â discussion or lesson 2 and then those categories can be added to your menu structure individually. When a visitor to the site clicks on the category in the menu, they will be taken to a page that contains a list of posts that have that specific category. This can be an easy way to organize student posts around a topic or lesson.
Can my students be auto-enrolled?
If your students are posting and commenting on the site, they will need to be auto-enrolled into the course web site. Students will be auto-enrolled with the permission level of ‘author’, i.e. they will be able to create new posts, comments, and upload media.
Complete this request form before the first day of class to get on the auto-enroll list. You will need to do this before the start of each semester you teach – but only if your students are posting on your class site.
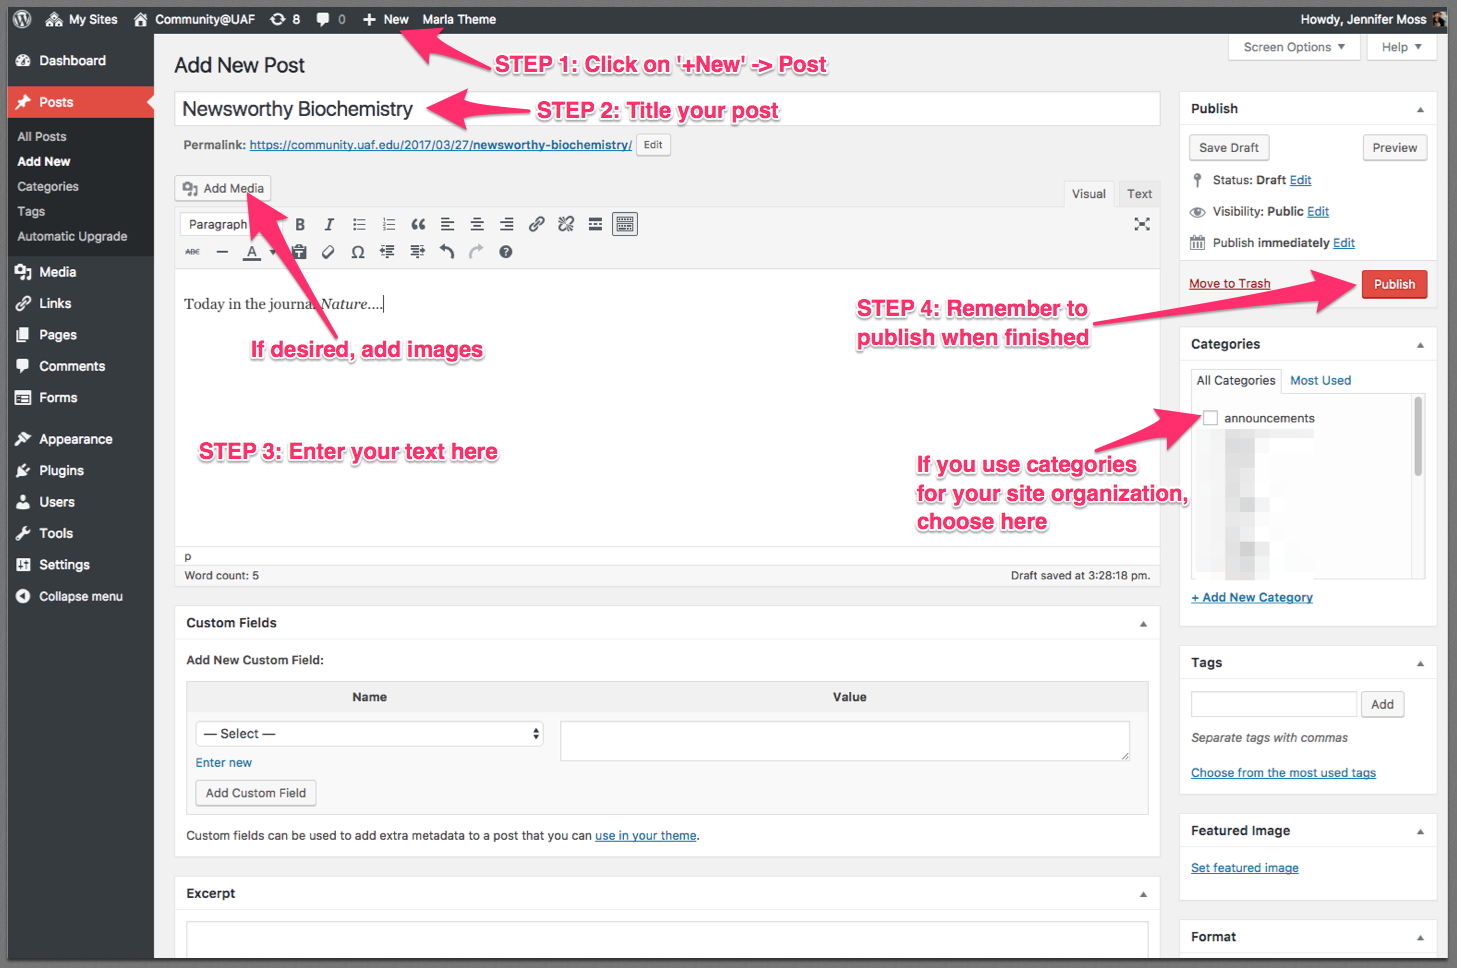
How do I make a new Post?
‘Posts’ (as opposed to ‘Pages’) are generally used for content that should be viewed chronologically. Blogs, for example, is the word for a series of posts that are displayed based on the time created. Posts can be used as a discussion tool – students would either create their own post or they might reply to a post.
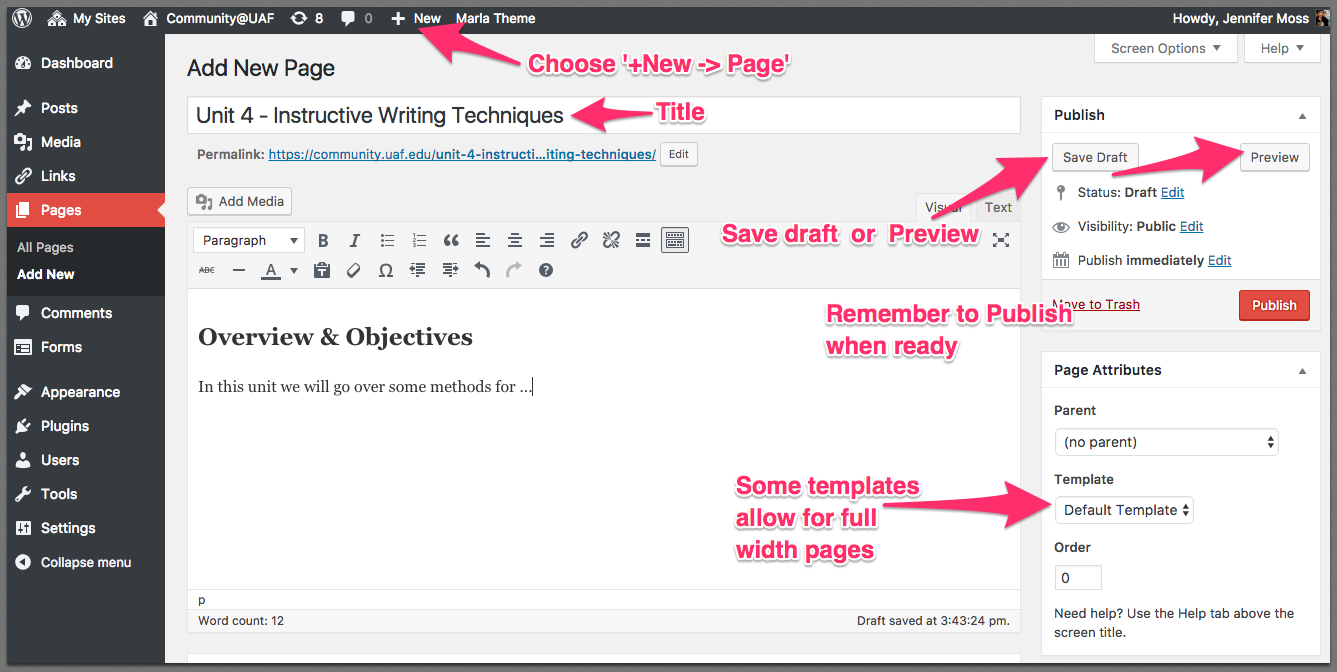
How do I make a new Page?
‘Pages’ are best for content that doesn’t change too often – like the syllabus, course schedule, lesson pages, about the instructor, etc.
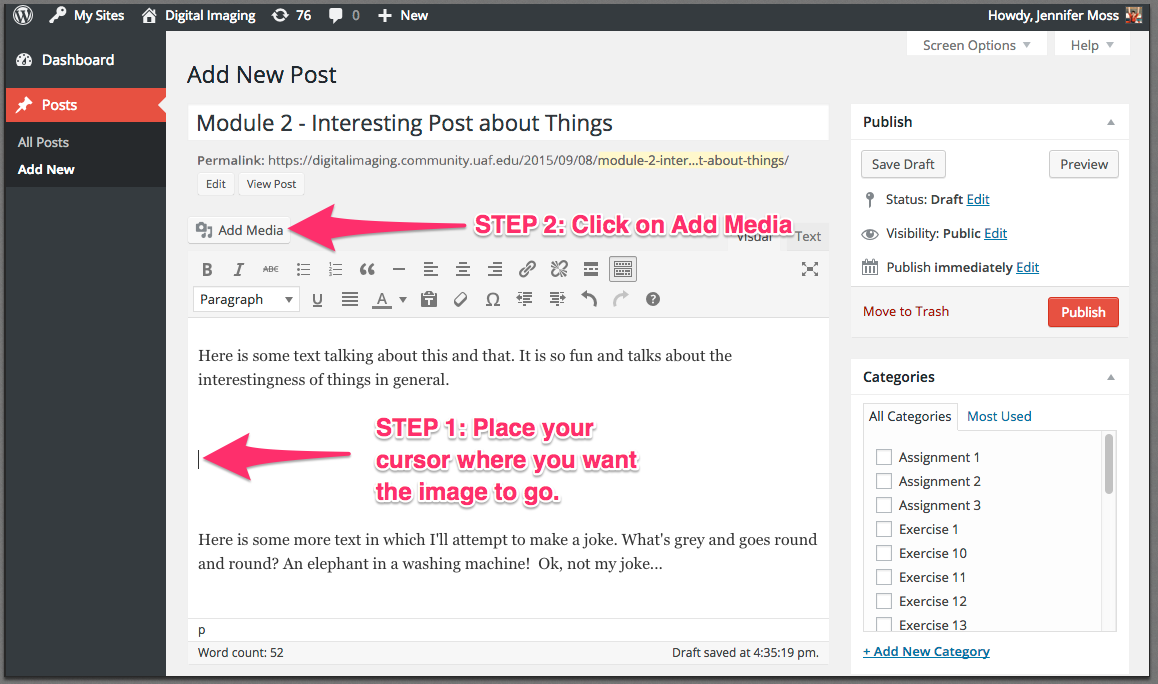
How do I add an image in my Post or Page?
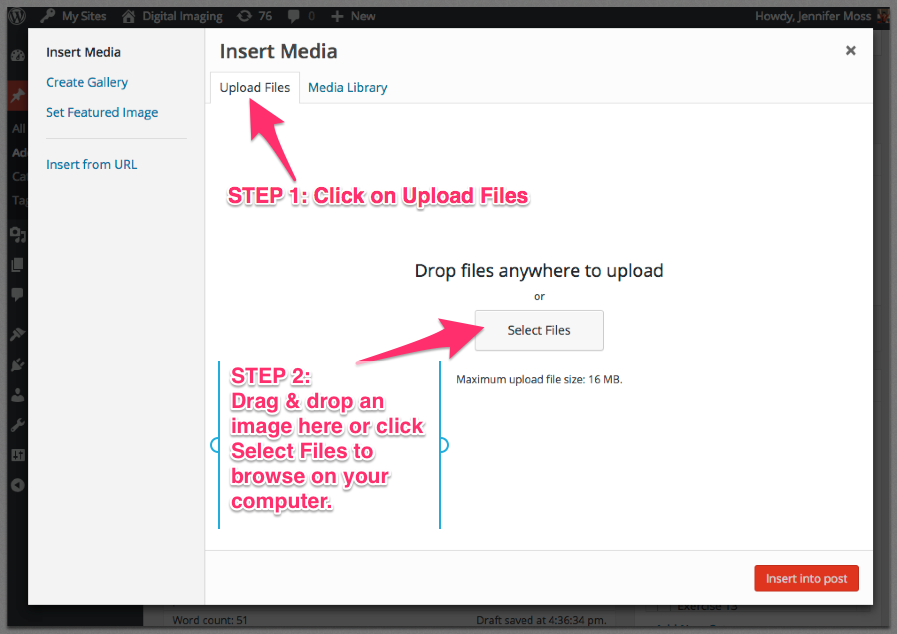
Login to your course site and create a new post or page. From within the post or page, put your cursor where you want the image to appear. Click on “Add Media.
In the new window, Select the “Upload Files tab and then “Select Files to select an image from your personal hard drive.
Browse on your hard drive until you find the image. Select the image and click “Open.
Your image will be added to the Media Library in your course site. With the image selected click on “Insert into Post.
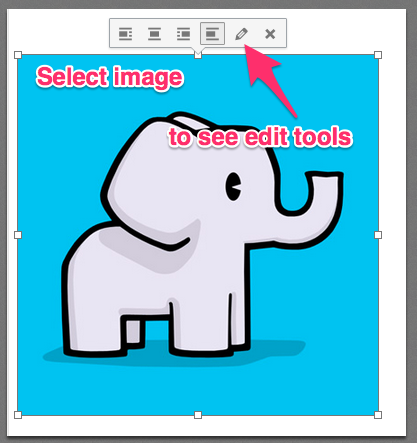
Once the image is in your post or page, to make edits, select the image and make a selection from the popup window. The first four icons set the layout, the “pencil icon will give you edit options, and the “x icon will remove the image from your post (but not the library).
How do I add a video to my Post or Page?
To add video from YouTube or Vimeo, simply copy the URL and past it into your post where you want it to appear.
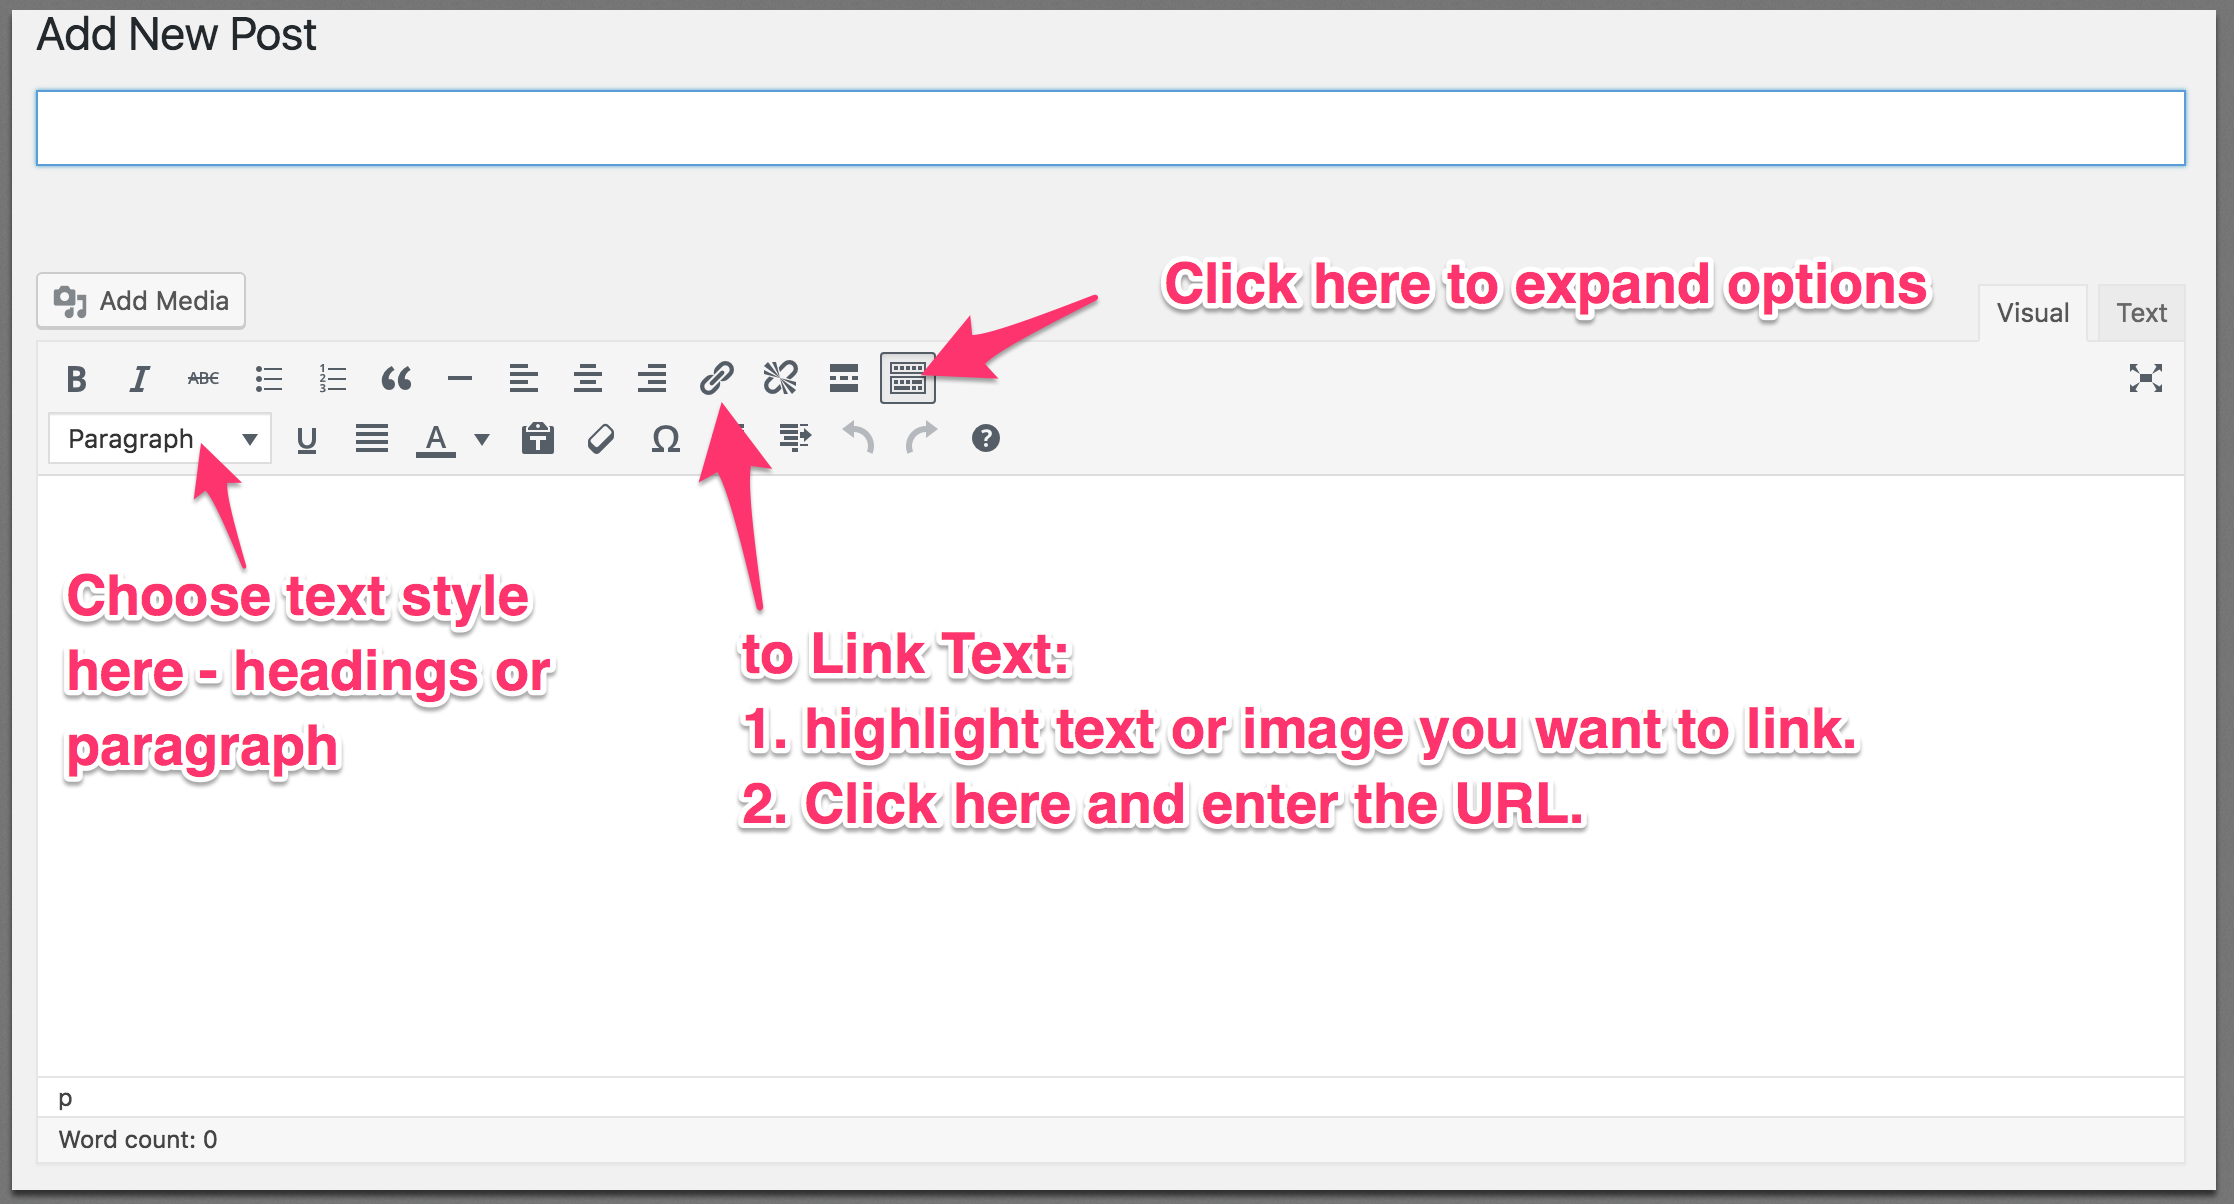
How do I format text on my Post or Page?
Format your text by using the options above the text area.
If you don’t see 2 lines of options, expand for more by clicking on the icon on the upper right:
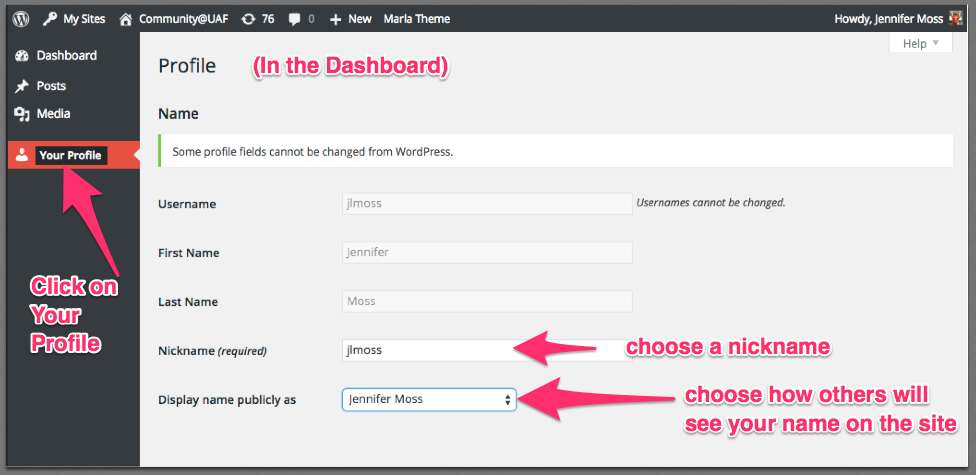
How do I change my display name
NOTE: Your Dashboard may look slightly different from this one, however, the procedure is the same. If students are authors on your site, you will want to let them know that they have the option of setting a nickname and choosing how their name is publicly displayed for FERPA regulations. Their Usernames will never change and should match their UA ID so you can keep track.
How do I change my Avatar photo?
Option 1
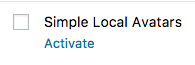
There is a plugin you can activate on your site called Simple Local Avatars that will allow for everyone to upload a photo to the site. From the Dashboard, go to Plugins and search for ‘simple local avatars’, then click on Activate.
Option 2
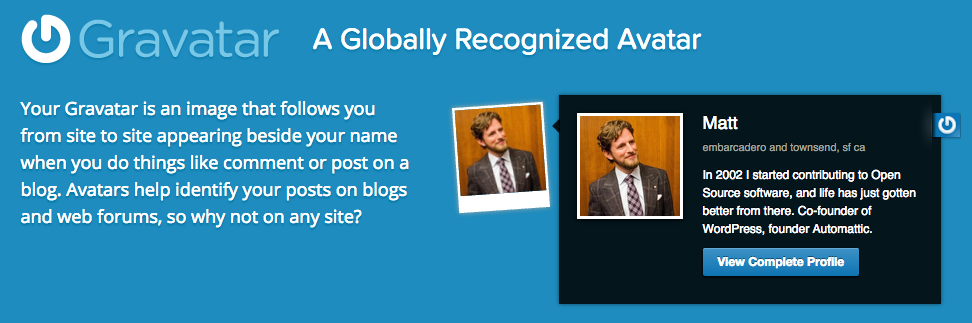
Most themes on Community will automatically use Gravatars — globally recognized avatars to personalize your posts. Get your Gravatar by going to: https://en.gravatar.com/. You will need to sign up for an account. Once you have a Gravitar, your picture will appear next to your posts and comments on both Community and all WordPress blogs!
Users
If you are teaching an eCampus-supported class, students will be automatically added to your site each semester as ‘Authors’.
If you are a site Administrator, you may want to add users to your site or change their permissions. If you do, remember to use their UA ID and email (@alaska.edu) when adding them – this way they will be able to use the single sign-on, which is the same for all university accounts like Blackboard, GMail, etc.
Permission Roles – what’s the difference?
There are different roles that you will be choosing from when adding or updating users:
Administrator – FULL ACCESS to creating, editing, deleting site materials, etc.
Editor – able to comment on, create or edit ANY post or page.
Author – able to create and edit THEIR OWN posts and comment on others.
Contributor – can comment but not publish (can not upload images).
Subscriber – can view only.
Start/End of Semester Tasks
Course Copy
Unfortunately, while we are technically are able to clone your site, it is not a practice we can do regularly because we have a limited number of sites that we can offer on the hosting platform. However, if you need a clone of the site for the purpose of a starting point for a different course or if a new instructor is teaching with your material, we are happy to provide the clone site for you.
We encourage faculty to design their course sites so that previous student work adds to the learning experience of the current students. In this scenario, student work never has to be hidden, which also makes sense when teaching on an open platform such as WordPress. In this way, a student who leaves your course can also link back to the work they did as a reference.
If you do want to tidy up each semester, we recommend doing the following:
change all user posts and comments for the semester to ‘Draft’ status
change all previous users to ‘Subscribers’ instead of ‘Authors’.
set up a category for each semester for new posts and set as default new post category, ‘202003-student’, for example, and instruct students not to de-select it on their posts. This will help you organize students based on when they attended class.
each year, delete posts from more than 1 year + 1 semester back to free up your media gallery and posts. (All student work must be retained for a minimum of this time.)
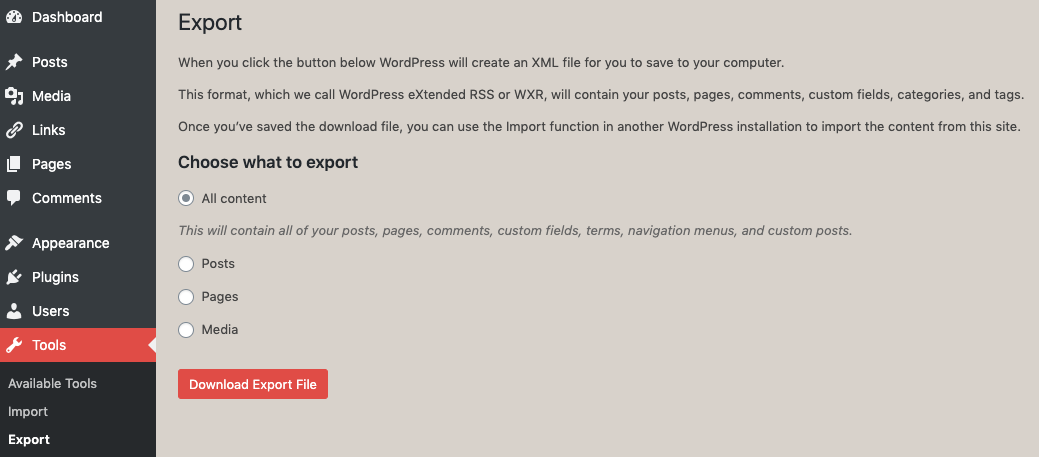
To do this, in the Dashboard, click on Tools->Export.
Choose Export for WordPress. Choose ‘All Content’.
The download file will be .xml – upload this .xml file into your Blackboard or Canvas course shell for the semester.
Removing Student Content
Remember, student work must be retained for at least 1year + 1 semester.
If you wish to remove student content, you will only need to do this if your students are contributing to the site:
Users – remove students and their posts
Comments – remove comments
It is always a good idea to export a copy of your course material before deleting anything just in case. Know that exporting a copy will not download the images, however.
Note: If you are teaching a class where students are creating a lot of content that they may want to use in the future, for future employment activities, for example, it is a good idea to have students create a space of their own on Google Sites, WordPress.com, Wix, or another website host that they can take with them after their studies.
Don’t forget to also test your site on mobile devices and perform a link check each semester to make sure everything is working as expected.
MORE
Common Questions about Community
What is Community@UAF?
Answer: Community@UAF is a WordPress installation for the University of Alaska Fairbanks primarily serving the needs of UAF eCampus faculty in terms of course blogging and open course materials. Community@UAF is a service of the UAF eCampus & Distance Education.
Can I get a site at Community@UAF?
Answer: If you are affiliated with the University of Alaska, you may request your own site. Please provide your name, UA email address, and requested site address on our contact form. At this time automatic signup is disabled. A Community@UAF administrator will create an account and basic blank site for you – most requests will be handled within 24 hours but please allow up to 1 week processing time.
I have a problem with my Community@UAF site. Can you help me fix it?
Answer: If you are an instructor, please join us during one of our Open Lab sessions, where we can answer questions one-on-one. We also recommend WordPress.tv for how-to tutorials or just googling your question.
We will attempt to notify site administrators of major updates and changes that affect everyone. If there is an issue you are concerned about, you may contact an administrator via the contact form.
I have a WordPress site that I want to move to a different WordPress installation outside of community, can I export/import my site?
Answer: Yes, in the Dashboard, use Tools->Export/Import.
I have a site on Community@UAF and I want to point my own domain name to my site, can I do this?
Answer: Currently, this functionality is not enabled for general use.
Can I install a new theme?
Answer: We have attempted to provide a variety of current themes with customization options. If there is a specific free theme you need to have installed, please use the contact form to make the request. The Community@UAF administrator will make the determination of whether the theme will be installed.
Note: For security reasons, any theme that becomes out of date with the most up to date installation of WordPress may be removed and you may be asked to change your site theme. We try to keep up to date on this but the reality is that sometimes themes are not updated by their creators and become a security risk or may affect the functionality of the site.
Question:Can I install a new plugin?
Answer: If you would like to install a plugin that is not currently available, you will need to make a request to the Community@UAF administrator. Please use the contact form to make this request. The administrator will make the determination of whether the plugin will be installed.
Note: For security reasons, any plugin that becomes out of date with the most up to date installation of WordPress may be removed and you may be asked to change your site theme. We try to keep up to date on this but the reality is that sometimes plugins are not updated by their creators and become a security risk or may affect the functionality of the site.
Question:Can you clone my old site each semester without student work?
While we are technically are able to clone your site, it is not a practice we can do regularly because we have a limited number of sites that we can offer on the hosting platform. However, if you need a clone of the site for the purpose of a starting point for a different course or if a new instructor is teaching with your material, we are happy to provide the clone site for you.
We encourage faculty to design their course sites so that previous student work adds to the learning experience of the current students. In this scenario, student work never has to be hidden, which also makes sense when teaching on an open platform such as WordPress. In this way, a student who leaves your course can also link back to the work they did as a reference.
If you do want to tidy up student work each semester, we recommend doing the following:
Change all user posts and comments for the semester to ‘Draft’ status.
Change all previous user to ‘Subscribers’ instead of ‘Authors’.
Set up a category for each semester for new posts and set as default new post category, ‘202003-student’, for example.
Each year, delete posts from more than 3 semesters back to free up your media gallery and posts. (All student work must be retained for at least 3 semesters.)
Note: One thing to know with the approach above is that any users with the permissions of ‘Editor’ will be able to see previous posts and comments regardless of their ‘Draft’ status.
This tidying up process just takes a few minutes each semester. Please come to Open Lab if you need a walk through.
I have more questions!
If we haven’t answered your question here, please contact us.


 H2->H3″ width=”402″ height=”407″>
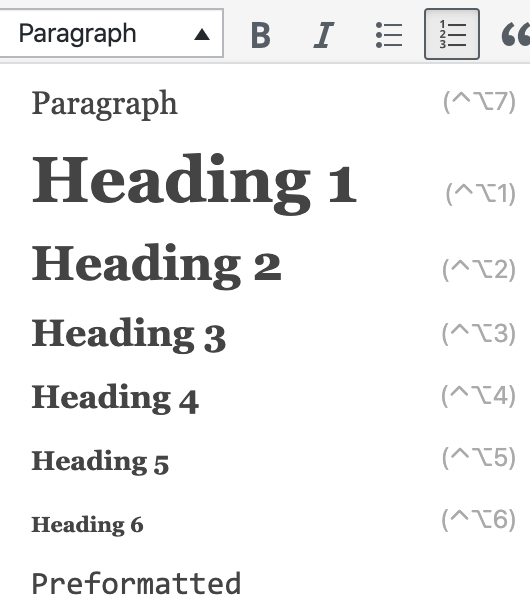
 Option 1